Found this tutorial online today about creating 3D model of treasure chest. You can also buy 3D models of treasure chests at Exchange3D.com In this tutorial i will try to give you a few tips to consider when baking normal map and ambient occlusion for a low poly game asset.
First of all let's introduce our scene. The scene i've made available for download contains this:
- 1 high poly chest
- 2 low poly chests:
- one with smoothing groups(auto smooth around 50)
- one with only one smoothing group
- 2 low poly baking chests - both with the overlapping faces removed ready to bake the maps from the high poly
- one with smoothing groups
- one with only one smoothing groupYou can download it from here
3ds max 2010 scene -http://rapidshare.com/files/381980322/tc_start_tutorial.rar
obj format -http://rapidshare.com/files/381979137/tc_start_tutorial_OBJ.rar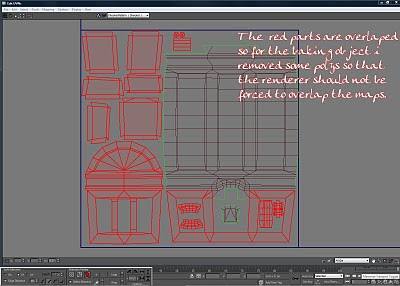
It is generally approved that for a game the props should have just one smoothing group. This is not entirely true. For old gen games and just for some engines this applies. For next gen games this applies only for some very weak engines. Unreal and crytech(the best engines in my opinion right now) don't have this limitation. This idea that one prop should have just one smoothing group appear also because for characters u'll use just one....but that's another story. If u have a continuous surface and with small angles between polys it is normal to have only one smoothing group...u wouldn't want to break...let's say a character face in 2 or more because of the sgroups...it will look bad as hell....but for a chest like this, or for a building or any other thing that has hard edges u should use smoothing groups. K. Back to our example.
If you look at my start image you will see that the chest in the middle has some serious problems...and all because it has only one smoothing group. One group means continuous surface....imagine that you will make an origami and never strengthen your edges...how it will look? At least odd. The difference between the left chest and the middle one is obvious. Now let's see how this will influence our baked maps. First step - Setting up the scene for baking
Usually i bake 3-4 maps for a prop - ambient occlusion, normal map, height map and a colored diffuse map to isolate different materials to easy up my texturing. Right now we will bake only 2. Ambient occlusion and normal map.
First of all change the renderer to mental ray. F10 or rendering menu - render setup and in the render setup chose from presets dropdown mental ray no gi. Also check the Enable Final Gather checkbox in the Indirect Illumination Tab and change the preset to low. And also in the Renderer tab change the Sampling Quality this way: minimum samples per pixel 1, maximum samples per pixel 16 and the type of filter to mitchell.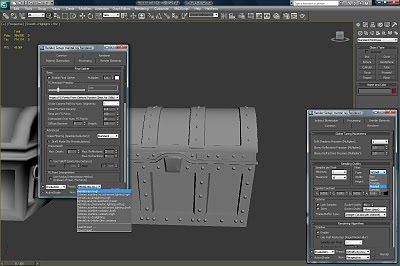 Next step is setting ur environment to white. Press 8 or go to rendering menu - environment. Change the background color to white and make sure no exposure control is activated. Also create a white diffuse standard material and assign it to chest_high.
 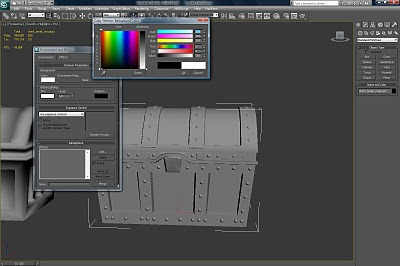 Now go to create - lights - standard - skylight and create a skylight. Check the use scene environment checkbox at the sky color tab.
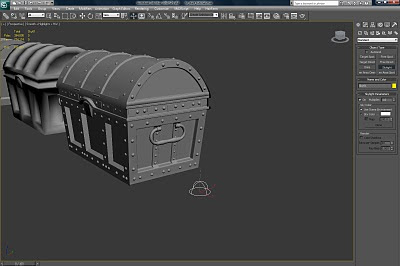 Now we are ready to bake.
Select chest_break_sgroups. Press 0(render to texture). Check the Projection Mapping enabled checkbox and pick the chest_high object as target. Don't worry about the distorted cage of the projection. We will repair it immediately. Go to projection modifier and in the cage tab hit the reset button. Then go to push and at amount insert 0.85.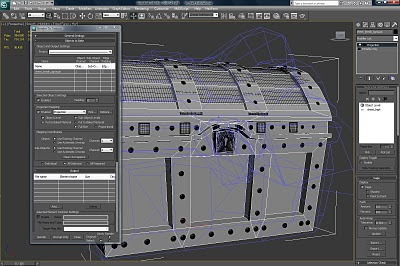
Now back to render to texture window. In the output tab add Ambient Occlusion(MR) and Normal Maps. Change the resolutions to 2048x2048 and also set a path were to save them(default path is ...project/sceneassets/images). Make sure both of them have a target map slot assigned. Hit render. Do the same thing for the chest_break_nosgroups.
This is what you should have now.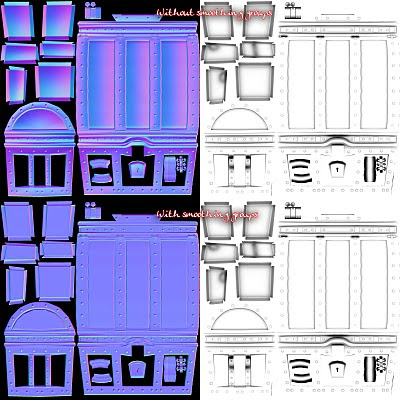 U can see that smoothing groups don't affect the aomap. But the normal map looks completely different. Those shades of pink and clear blue in the nosgroups nmap represent different illumination. THIS IS WRONG! Ok. Now u will say that this will compensate with the odd look of the nosgroups mesh....but no...you will see....it will just make it odder.
It's time to preview our baked maps.
Delete the skylight. Hide the high and the baking objects. Unhide the final layer.
Open material editor. The first 2 slots are some standard materials that i've applied to our low poly chests. First is for the nosgroups and the second for the one with smoothing groups. Go in materials and search for the direct x manager(if u have autodesk 3ds max design u won't find it...u'll have to find another way to preview ur mesh...a render perhaps). In the direct x manager select from the dropdown Metal Bump9 and make sure u check the Enable Plugin Material. No go in the DirectX Shader - Metal Bump 9 tab and add as ambient&diffuse texture the ambient occlusion and as normal bump the normal map. Do this for our both materials.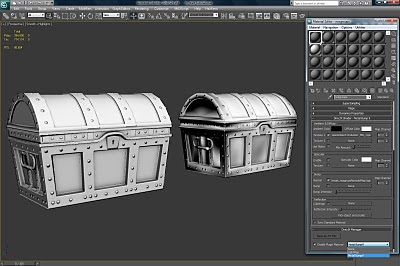 U see? The one in the right(the nosgroups) look ..."bleah!". That's why we need to bake them correctly. All we have to do now is to start making the textures. Use the aomap overlaying it with multiply over the diffuse and you can do beautiful things. This is what i've did with my chest. Hope you like it.
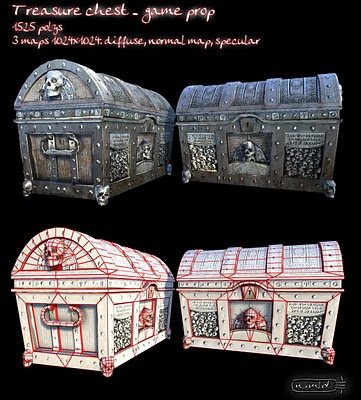
I hope this tutorial answered some of your questions and i really hope it helped. Until next time bye and i'll wait some texture variants for my chest...let's see what u can do :)
First of all let's introduce our scene.
 The scene i've made available for download contains this:
- 1 high poly chest
- 2 low poly chests:
- one with smoothing groups(auto smooth around 50)
- one with only one smoothing group
- 2 low poly baking chests - both with the overlapping faces removed ready to bake the maps from the high poly
- one with smoothing groups
- one with only one smoothing groupYou can download it from here
3ds max 2010 scene -http://rapidshare.com/files/381980322/tc_start_tutorial.rar
obj format -http://rapidshare.com/files/381979137/tc_start_tutorial_OBJ.rar

It is generally approved that for a game the props should have just one smoothing group. This is not entirely true. For old gen games and just for some engines this applies. For next gen games this applies only for some very weak engines. Unreal and crytech(the best engines in my opinion right now) don't have this limitation. This idea that one prop should have just one smoothing group appear also because for characters u'll use just one....but that's another story. If u have a continuous surface and with small angles between polys it is normal to have only one smoothing group...u wouldn't want to break...let's say a character face in 2 or more because of the sgroups...it will look bad as hell....but for a chest like this, or for a building or any other thing that has hard edges u should use smoothing groups. K. Back to our example.
If you look at my start image you will see that the chest in the middle has some serious problems...and all because it has only one smoothing group. One group means continuous surface....imagine that you will make an origami and never strengthen your edges...how it will look? At least odd. The difference between the left chest and the middle one is obvious. Now let's see how this will influence our baked maps. First step - Setting up the scene for baking
Usually i bake 3-4 maps for a prop - ambient occlusion, normal map, height map and a colored diffuse map to isolate different materials to easy up my texturing. Right now we will bake only 2. Ambient occlusion and normal map.
First of all change the renderer to mental ray. F10 or rendering menu - render setup and in the render setup chose from presets dropdown mental ray no gi. Also check the Enable Final Gather checkbox in the Indirect Illumination Tab and change the preset to low. And also in the Renderer tab change the Sampling Quality this way: minimum samples per pixel 1, maximum samples per pixel 16 and the type of filter to mitchell.
 Next step is setting ur environment to white. Press 8 or go to rendering menu - environment. Change the background color to white and make sure no exposure control is activated. Also create a white diffuse standard material and assign it to chest_high.
  Now go to create - lights - standard - skylight and create a skylight. Check the use scene environment checkbox at the sky color tab.
 Now we are ready to bake.
Select chest_break_sgroups. Press 0(render to texture). Check the Projection Mapping enabled checkbox and pick the chest_high object as target. Don't worry about the distorted cage of the projection. We will repair it immediately. Go to projection modifier and in the cage tab hit the reset button. Then go to push and at amount insert 0.85.

Now back to render to texture window. In the output tab add Ambient Occlusion(MR) and Normal Maps. Change the resolutions to 2048x2048 and also set a path were to save them(default path is ...project/sceneassets/images). Make sure both of them have a target map slot assigned. Hit render. Do the same thing for the chest_break_nosgroups.
This is what you should have now.
 U can see that smoothing groups don't affect the aomap. But the normal map looks completely different. Those shades of pink and clear blue in the nosgroups nmap represent different illumination. THIS IS WRONG! Ok. Now u will say that this will compensate with the odd look of the nosgroups mesh....but no...you will see....it will just make it odder.
It's time to preview our baked maps.
Delete the skylight. Hide the high and the baking objects. Unhide the final layer.
Open material editor. The first 2 slots are some standard materials that i've applied to our low poly chests. First is for the nosgroups and the second for the one with smoothing groups. Go in materials and search for the direct x manager(if u have autodesk 3ds max design u won't find it...u'll have to find another way to preview ur mesh...a render perhaps). In the direct x manager select from the dropdown Metal Bump9 and make sure u check the Enable Plugin Material. No go in the DirectX Shader - Metal Bump 9 tab and add as ambient&diffuse texture the ambient occlusion and as normal bump the normal map. Do this for our both materials.
 U see? The one in the right(the nosgroups) look ..."bleah!". That's why we need to bake them correctly. All we have to do now is to start making the textures. Use the aomap overlaying it with multiply over the diffuse and you can do beautiful things. This is what i've did with my chest. Hope you like it.
I hope this tutorial answered some of your questions and i really hope it helped. Until next time bye and i'll wait some texture variants for my chest...let's see what u can do :)
No comments:
Post a Comment